Avventure in Carpenteria, parte seconda.
Si', e' il ritorno del casinista attrezzato.
Ordunque, l'anno scorso, avendo del tempo libero e non potendomi muovere di casa causa apocalisse-zombie, mi sono deciso a mettere insieme una "rimessa" per la bicicletta decente, spostando le bici da quello che passa per la mia "baracca degli attrezzi". Ed avevo anche ipotizzato l'idea di rinnovare tale "baracca" e produrre qualche cosa di piu' funzionale.
Quest'anno, essendo piu' o meno nelle stesse condizioni, e' venuto il momento.
La vecchia "baracca" era stata assemblata da un "kit" acquistato dal locale magazzino del fai-da-te, non e' che fosse male, in effetti, avendo io pressoche' zero abilita' nella costruzione di cose di una certa dimensione, avere i pezzi gia' pronti solo da assemblare e' stata una manna. Purtroppo pero' non ho visto che nelle "idee" di chi tale baracca l'ha progettata, avrebbe dovuto essere assemblata su un robusto basamento di cemento o mattoni, e dato che non lo sapevo, non l'ho fatto, percui la baracca e' risultata piu' bassa di quanto avrebbe dovuto essere. Abbastanza bassa in effetti da picchiare una craniata sulla porta ogni volta che entro o esco.
La qualita' generale e' risultata anche abbastanza bassa. Suppongo che parte di questo sia da attribuire all'assemblaggio "irregolare", ma infiltrazioni di acqua hanno fatto la loro comparsa abbastanza presto, il fatto che i gatti abbiano trovato il tetto di "asfalto" un grattino irresistibile non ha di certo aiutato.
Onde per cui, quest'anno e' venuto il momento per la vecchia di andare al riciclaggio ed una nuova costruzione prendere il suo posto.
E, di nuovo, ho deciso di cimentarmi nel "fai-da-te" estremo e fabbricare tutto da zero.
Per prima cosa ho dovuto fare un mezzo piano d'azione. Ho cominciato dalla realta: sono io che fabbrico sto' coso, e dato che sono l'opposto di un carpentiere e le mie doti di falegnameria sono meno che nulle, ho deciso subito di lasciare perdere cose come "giunti" e costruzioni sofisticate. Altro problema e' che "sono io che la costruisco", quindi non solo devo riuscire a costruire i vari pezzi, devo anche trovare il modo di metterli in piedi ed insieme. Da solo. Quindi c'e' un ovvio limite a quanto le varie parti possono pesare prima che l'intera cosa diventi impossibile da gestire.
In particolare i muri che vanno verso la staccionata che segna il limite della mia proprieta' dovranno essere "finiti" all'esterno prima di essere piazzati perche' non ho modo altrimenti di "finirli" dopo. Il che significa che dovro' trovare il modo di alzarli in piedi e TENERLI in piedi mentre li finisco e poi metterli a posto.
Un'altra cosa e' che volevo cercare di ridurre i costi, dato che una baracca esiste gia' ed e' fatta in legno, cerchero' di riutilizzare il materiale il piu' possibile. Quindi devo smantellarla in modo intelligente e non semplicemente "demolirla".
Ennesimo problema e' che non ho lo spazio sufficiente a poter acquistare tutto il materiale in un colpo solo, il che mi impedisce di farlo consegnare a domicilio, quindi dovro' comperare il materiale un po' alla volta a seconda di quello che mi serve al momento ed andarmelo a prendere direttamente. Si trattera' di fare parecchi viaggi avanti e indietro e spostare legno a mano. Insomma faro' parecchia ginnastica.
Dopo averci rimunginato sopra per un bel po', mi sono fatto un piano di azione, e poi e' stato il momento di mettersi al lavoro.
La prima fase e' stata quella di svuotare completamente la baracca vecchia, che e' stato anche un viaggio nell'assurdo ("io ho cosa? QUANTI??? che cazzo l'ho comperata a fare quella roba? e perche' e' ancora qui?"), dopo diversi viaggi all'immondizzaio sono riuscito ad immagazzinare le cose da tenere parte nella "rimessa delle bici" (che e' diventata un ripostiglio temporaneo) mentre gli attrezzi utili sono stati temporaneamente parcheggiati in casa.


Lo smantellamento, purtroppo, ha dovuto essere posposto causa pioggia.
Il mattino dopo, di buon ora, ho cominciato a prendere a martellate in posizioni strategiche la struttura, e ben presto mi sono ritrovato con una decapottabile. Nel giro di un paio d'ore, la struttura era svanita.

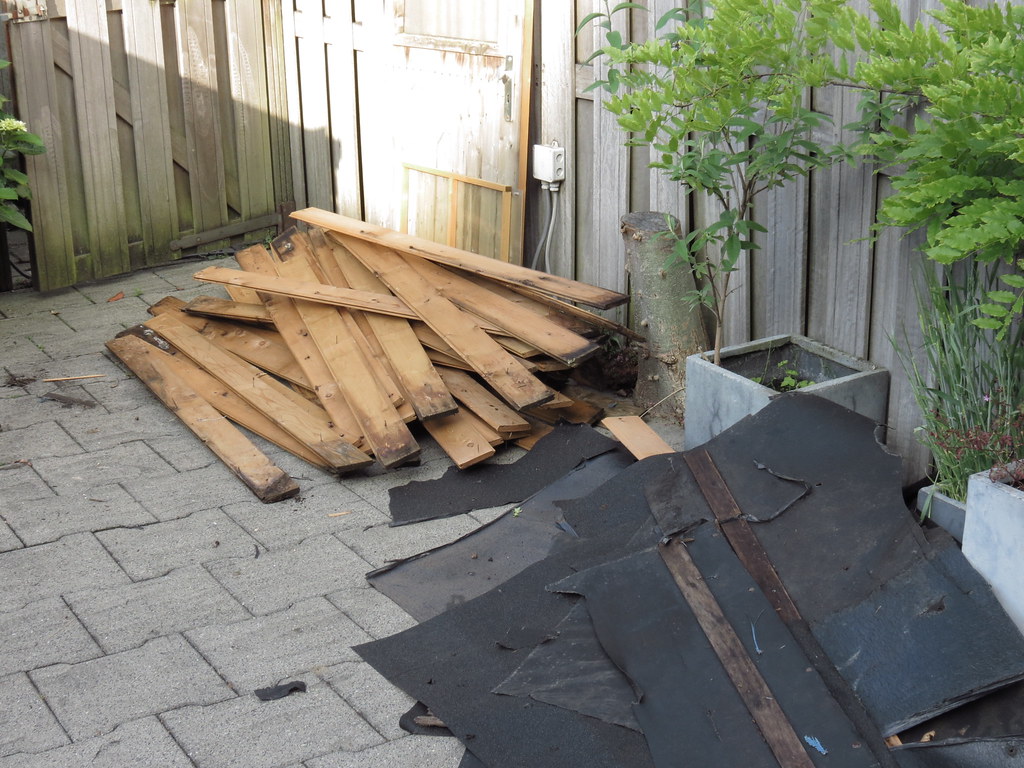
Dopo aver risistemato e selezionato il materiale vecchio, rimuovendo tutti i chiodi, viti, graffette etc., ho cominciato risistemando la "base", che deve essere ampliata di circa 30 cm da un lato e 40 dall'altro. La baracca nuova sara' relativamente piu' grande, ma non di tanto. In effetti alla fine occupera' praticamente lo stesso spazio, eccetto che in altezza.


La rimozione della baracca ha anche rivelato la massa di roba verde che si nascondeva la' dietro, ma e' stata rimossa subito.

Sistemato il basamento, ampliato usando materiale di riciclo della baracca vecchia, ho finito di ripulire il legname della baracca vecchia. Ed ho preparato per la fase successiva. Che e' cominciata andando al locale rivenditore di legno ed acquistando una mezza tonnellata di legni da costruzione, con i quali ho fabbricato il primo dei muri. Dopo averlo copiato, in modo da avere almeno due muri uguali, ho cominciato con il rivestirlo di plastica impermeabile, poi e' stato parzialmente ricoperto con i listelli della baracca vecchia, quindi eretto in posizione, assicurato con listelli "temporanei" e finito all'esterno ed alla fine messo in posizione.


Ho ripetuto l'operazione con il muro di fondo e dopo parecchio smartellare, alla fine del secondo giorno avevo una struttura parziale che stava in piedi piu' o meno da sola.

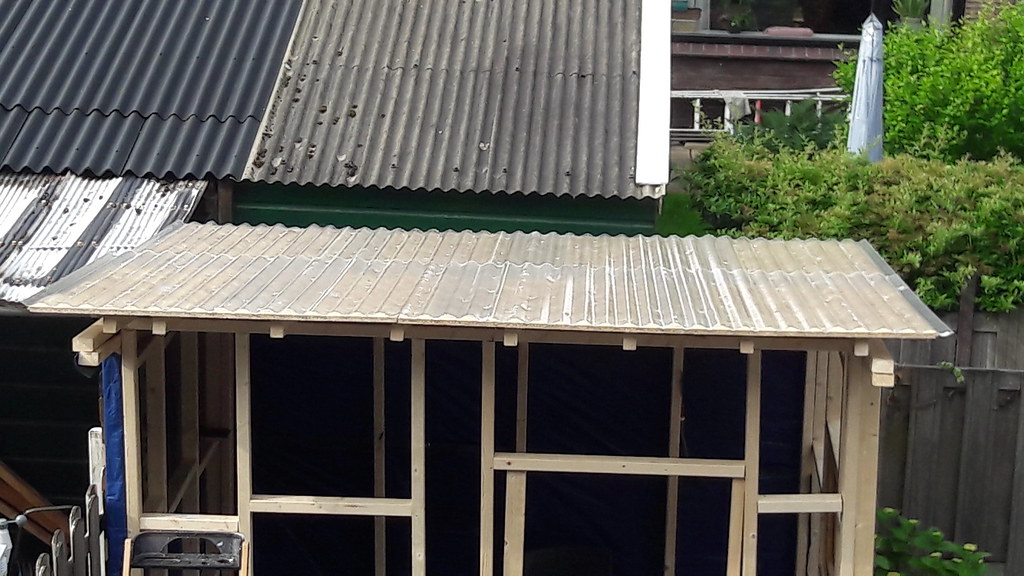
Altro giorno, altra mezza tonnellata di legno. Il "fronte" e la struttura del tetto vengono completate, a quel punto ho deciso di andare a prendere anche i pannelli per completare al copertura del tetto. E' a questo punto che l'imprevisto si verifica: trasportando sul portapacchi i "pannelli" per il tetto, 5 delle 6 corde elastiche che usavo per fissare i pannelli si sono spezzate (!) con il risultato che ho sparpagliato i pannelli per la strada. Il tergicristallo dell'auto ha, eroicamente, tentato di opporsi alla fuga me non c'e' stato niente da fare. RIP tergicristallo... Ma ho imparato la mia lezione: CINGHIE DI NYLON d'ora in poi!
Comunquesia, i pannelli sono recuperati, trasportati a casa e sistemati dove dovrebbero stare. Ed il tetto comincia a sembrare un tetto.


Il mattino dopo, sono andato a prendere dell'ondulato per completare il tetto, e dopo aver piantato un centinaio di viti, il tetto e stato dichiarato "sufficientemente a prova di pioggia". A questo punto ho completato l'applicazione della plastica isolante sulle pareti e poi mi sono messo a fabbricare una porta.


Una volta messa anche la porta, la nuova struttura e' sufficientemente a prova di pioggia da poterla considerare "funzionale". A questo punto ho continuato con l'operazione di rivestimento fino ad esaurire tutto il materiale che mi era rimasto della baracca vecchia. Dopo di che, si tratta di andare a prenere degli altri listelli (si vede bene la differenza tra il materiale vecchio e quello nuovo) e completare l'opera.


E dopo poco, la baracca cominca ad assumere un aspetto di "baracca degli attrezzi". E finalmente, posso entrere ed uscire senza rischiare craniate nella porta.
Una menzione agli eroi di questa costruzione:

Da sinistra a destra, fondo - fronte: pistola sparachiodi, avvitatore ad impatto, trapano, sega reciprocatrice, sega circolare, cuffia antirumore, squadra, metro, pistola sparagraffette, livella.
Adesso devo finire di portare rottami di legno all'immondizzaio e poi sono a posto almeno per qualche anno.
E adesso, un paio di risposte alle domande che tutti si stanno ponendo:
- Ma sei scemo o non ci hai un cazzo di meglio da fare? Esatto
- Sbaglio o e' storta? Anche la torre di Pisa lo e', e ci hanno messo 300 anni a farla.
- Ma non ti conveniva prenderne una gia' fatta?Definisci "convenire"
- Quanto hai speso?
Allora, cominciamo con il dire che io avevo cominciato a fare un preventivo l'anno scorso, e da quel periodo ad oggi, i prezzi di praticamente tutti i materiali sono aumentati di parecchio. Per fare un semplice esempio, i legni che ho usato di piu' sono 44x69x270 e quando ho fatto i calcoli venivano 5.5 euro l'uno. Quando li ho presi erano circa 8.5 euro l'uno, un aumento del 65%.Comunque, il legno per la struttura mi e' costato circa 410 euro, per il tetto tra i pannelli OSB (che in italiano credo si chiami impallacciato) e l'ondulato ho speso 320 euro, il materiale per l'esterno e' quello che mi e' costato di meno dato che sono riuscito a riciclare quasi il 100% della vecchia baracca, ed ho speso solo 180 euro. Un po' di minuteria (viti, chiodi, serratura, cerniere, interruttori, prese, cavi vari) sono venuti fuori un altro 120 euro (circa).
Totale della spesa: circa 1000 euro.
No, la riparazione dell'auto non la conto nella spesa, anche se ne farebbe parte.
Davide Bianchi
29/06/2021 13:06

